How to Make Driftwood Safe for Aquarium?
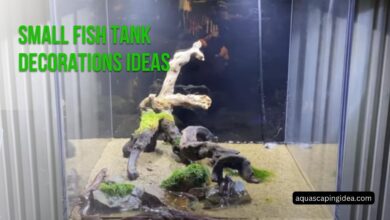
Imagine your aquarium transformed into a mesmerizing underwater landscape, with graceful fish gliding through intricate driftwood structures. The allure of driftwood in aquariums is undeniable – it adds a natural, rustic charm while providing valuable hiding spots and territories for your aquatic friends. However, before you can create this aquatic wonderland, it’s crucial to understand how to make driftwood safe for your aquarium.
In this comprehensive guide, we’ll dive deep into the world of aquarium driftwood. We’ll explore why it’s essential to prepare driftwood properly, the potential risks of untreated driftwood, and provide you with a step-by-step process to ensure your driftwood is not only safe but also a stunning addition to your underwater ecosystem.
Whether you’re a seasoned aquarist or a beginner just starting your aquatic journey, this article will equip you with the knowledge and techniques to transform raw driftwood into a safe, beautiful, and beneficial element for your aquarium. Let’s embark on this journey to create a safer, more natural habitat for your aquatic pets!
Why Prepare Driftwood for Your Aquarium?
Before we delve into the how-to, it’s crucial to understand why preparing driftwood is so important. Here are the key reasons:
1. Removing Harmful Substances
Driftwood found in nature can harbor a variety of harmful substances:
- Pollutants: Driftwood from beaches or rivers may have absorbed pollutants from the water.
- Parasites and Bacteria: These microorganisms can be harmful to your aquarium inhabitants.
- Salt: Driftwood from marine environments contains salt, which can alter your freshwater aquarium’s chemistry.
2. Preventing Water Discoloration
Untreated driftwood often releases tannins, which can turn your aquarium water a tea-like brown color. While not harmful, this can be aesthetically unpleasing and may alter your water’s pH.
3. Ensuring Buoyancy Control
Raw driftwood tends to float, which can be problematic if you want it to remain at the bottom of your tank. Proper preparation helps waterlog the wood, ensuring it sinks and stays put.
4. Avoiding Sharp Edges
Natural driftwood may have sharp edges or splinters that could harm your fish. Preparation allows you to identify and smooth out these potential hazards.
Types of Driftwood Suitable for Aquariums
Not all driftwood is created equal when it comes to aquarium use. Here’s a breakdown of some popular types:
| Driftwood Type | Characteristics | Best For |
|---|---|---|
| Mopani Wood | Dense, sinks easily, releases tannins | Larger tanks, cichlid habitats |
| Malaysian Driftwood | Branchy, great for attaching plants | Planted tanks, creating depth |
| Spider Wood | Delicate, intricate branches | Nano tanks, aquascaping |
| Cholla Wood | Hollow, great for shrimp | Shrimp tanks, small fish habitats |
| Ghostwood | Pale color, minimal tannin release | Light-colored aquascapes |
The Step-by-Step Process: Making Driftwood Aquarium-Safe
Now that we understand the importance of preparation and the types of driftwood available, let’s dive into the step-by-step process of making driftwood safe for your aquarium.
Step 1: Choosing the Right Driftwood
Sourcing Your Driftwood
When selecting driftwood for your aquarium, you have two main options:
- Purchase from a reputable aquarium supplier: This is often the safest option, as the wood is usually pre-treated and specifically chosen for aquarium use.
- Collect from nature: If you choose this route, be aware of local regulations. Collect from clean, unpolluted areas away from industrial sites or heavily populated regions.
Identifying Safe Wood Types
If collecting from nature, stick to hardwoods like oak, maple, or fruit trees. Avoid softwoods like pine or cedar, which can release harmful resins.
Step 2: Initial Cleaning
Materials Needed:
- Soft-bristled brush
- Bucket of clean water
- Gloves (optional)
Process:
- Rinse the driftwood thoroughly under running water to remove loose debris.
- Use the soft-bristled brush to gently scrub the surface, paying extra attention to crevices and bark.
- Rinse again until the water runs clear.
Step 3: Removing Loose Bark and Smoothing Rough Edges
Materials Needed:
- Scraping tool (putty knife or flathead screwdriver)
- Sandpaper (various grits)
Process:
- Carefully remove any loose bark using the scraping tool. Be gentle to avoid damaging the wood.
- Identify any sharp edges or splinters.
- Use coarse-grit sandpaper to smooth these areas, then finish with fine-grit for a polished look.
Step 4: Boiling the Driftwood
Materials Needed:
- Large pot or container
- Stove or other heat source
- Tongs or heat-resistant gloves
Process:
- Fill a pot with enough water to fully submerge the driftwood.
- Bring the water to a rolling boil.
- Carefully add the driftwood and reduce heat to maintain a gentle boil.
- Boil for 1-2 hours, depending on the size of the wood.
- Use tongs to carefully remove the wood and let it cool.
Why Boiling is Crucial:
- Kills harmful bacteria and parasites
- Helps release tannins
- Begins the waterlogging process
Step 5: Soaking the Driftwood
Materials Needed:
- Large container (bucket, tub, or tank)
- Clean, dechlorinated water
- Weights (if necessary)
Process:
- Fill your container with dechlorinated water.
- Submerge the boiled driftwood completely. Use weights if it floats.
- Change the water every few days, noting its color.
- Continue soaking until the water remains clear, which can take anywhere from a week to several months depending on the wood.
Monitoring Water Parameters:
During the soaking process, it’s helpful to monitor the water parameters:
| Parameter | What to Look For |
|---|---|
| pH | Should stabilize over time |
| Tannins | Water should become clearer |
| Hardness | May increase slightly |
Step 6: Treating with Hydrogen Peroxide (Optional)
For extra sterilization, especially if you’re concerned about potential contaminants:
Materials Needed:
- 3% Hydrogen peroxide solution
- Spray bottle
- Protective gloves
Process:
- In a well-ventilated area, spray the driftwood thoroughly with hydrogen peroxide.
- Let it sit for 5-10 minutes.
- Rinse thoroughly with clean water.
- Return to soaking for at least 24 hours before use.
Step 7: Final Inspection and Preparation
What to Look For:
- Ensure all surfaces are smooth
- Check for any remaining loose bark
- Verify the wood sinks in water
Final Steps:
- Give the wood a final rinse with dechlorinated water.
- If attaching plants, identify suitable areas for attachment.
- Plan the placement in your aquarium, considering fish traffic and plant growth.
Incorporating Driftwood into Your Aquarium
Now that your driftwood is safe and ready, it’s time to add it to your aquarium. Here are some tips for successful incorporation:
1. Aquascaping with Driftwood
- Create Depth: Use larger pieces at the back, smaller in front.
- Form Natural Groupings: Arrange multiple pieces to mimic natural formations.
- Consider Negative Space: Leave open areas for fish to swim.
2. Enhancing with Plants
Driftwood provides excellent attachment points for various aquatic plants:
| Plant Type | Best Attachment Method |
|---|---|
| Java Fern | Tie with fishing line or cotton thread |
| Anubias | Secure rhizome to wood with gel superglue |
| Moss | Use mesh or fishing line to attach |
3. Monitoring Water Parameters
After adding driftwood, closely monitor your aquarium’s water parameters for the first few weeks:
- pH: May drop slightly due to residual tannins
- Hardness: Could increase if the wood releases minerals
- Ammonia/Nitrites: Should remain at 0 ppm
4. Maintenance
- Regularly clean the driftwood during water changes to remove debris.
- If algae growth becomes an issue, gently scrub with a soft brush.
The Benefits of Properly Prepared Driftwood in Aquariums
When done correctly, adding driftwood to your aquarium offers numerous benefits:
- Natural Habitat: Mimics the natural environment of many fish species.
- pH Buffer: Can help maintain slightly acidic conditions preferred by many tropical fish.
- Algae Control: Provides a natural surface for beneficial bacteria, competing with algae for nutrients.
- Behavioral Enrichment: Offers hiding spots and territory markers for fish.
- Aesthetic Appeal: Enhances the natural beauty of your aquarium.
Potential Challenges and Solutions
While driftwood can be a fantastic addition to your aquarium, it’s important to be aware of potential challenges:
| Challenge | Solution |
|---|---|
| Persistent Tannins | Use activated carbon in your filter |
| Fungal Growth | Usually harmless, will disappear over time. Can be gently scrubbed off |
| Altered Water Chemistry | Regular water testing and changes to maintain stability |
FAQ: Common Questions About Aquarium Driftwood
Q: How long does it take for driftwood to stop releasing tannins?
A: This can vary greatly depending on the type and size of wood, ranging from a few weeks to several months. Consistent soaking and water changes will speed up the process.
Q: Is it safe to use driftwood I found at the beach?
A: While possible, it’s risky due to potential pollutants and salt content. If you choose to use beach driftwood, be prepared for an extensive preparation process.
Q: Can I use driftwood in a saltwater aquarium?
A: It’s generally not recommended for saltwater setups due to the risk of altering water chemistry and introducing unwanted organic matter.
Q: How do I know if my driftwood is releasing harmful substances?
A: Monitor your fish for signs of stress or illness, and regularly test your water parameters. Any sudden changes could indicate a problem.
Q: Can I speed up the waterlogging process?
A: Boiling the wood for longer periods and using weights during the soaking process can help speed up waterlogging.
Conclusion
Incorporating driftwood into your aquarium can transform it into a stunning, natural underwater landscape. By following this comprehensive guide, you can ensure that your driftwood is not only safe for your aquatic inhabitants but also a beautiful and beneficial addition to your tank’s ecosystem.
Remember, the key to success lies in patience and thorough preparation. From the initial cleaning to the final placement in your aquarium, each step plays a crucial role in creating a safe and harmonious environment for your fish.
As you embark on your driftwood aquascaping journey, don’t be afraid to get creative. Experiment with different arrangements, combine various types of driftwood, and watch as your aquarium evolves into a unique underwater world.
With properly prepared driftwood, you’re not just decorating your aquarium – you’re creating a thriving, natural habitat that will bring joy and fascination for years to come. Happy aquascaping!


